How to boresight a rifle
Step 1. Equipment.
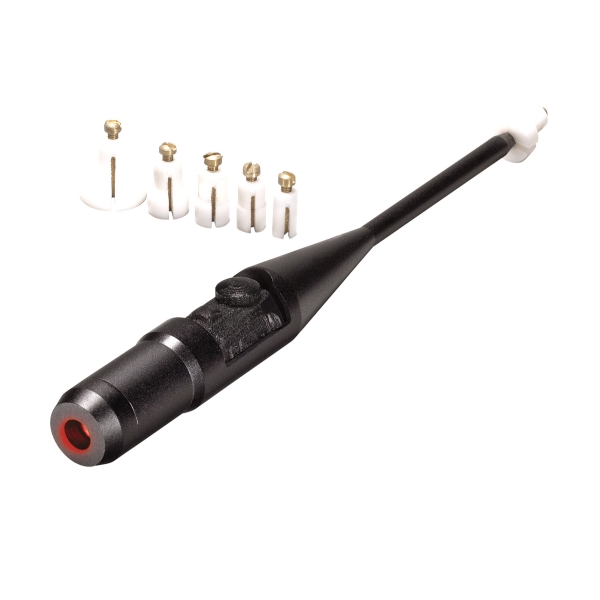
First, buy a laser boresighter:
There are a whole lot of clones, and they are really all the same. Just go by the price.
For example: http://www.grafs.com/retail/catalog/product/productId/1054
Expect to pay $25-$30 plus shipping. Cabelas sells them for $60. They are insane. No, theirs are not any more "accurate". Nor "professional". Most
likely, they were made at the same factory.
You will also need a way to securely position your rifle. A shooting or a cleaning rest would do.
The batteries in these lasers last minutes, not hours as advertised, so either a supply of batteries or a DC power supply is in order. Usually they
are fed using 2 1.5V batteries, so I took a 3V DC power supply and rigged the wires to the contacts on the laser. It looks ugly, but it works, and I
don't have to worry about the batteries any more.
The cheapest place to buy batteries is either eBay or Amazon marketplace. You will need a lot of them (well, if you are going to boresight a lot of rifles),
so buy the biggest pack!
Finally, print this target. You will need an XPS viewer. Some windows systems require you enable it. I have
no idea why is it not on by default. On Windows 7: Control Panel->Programs->Turn Windows Features On/Off and it's at the very end of the dialog.
Notes:
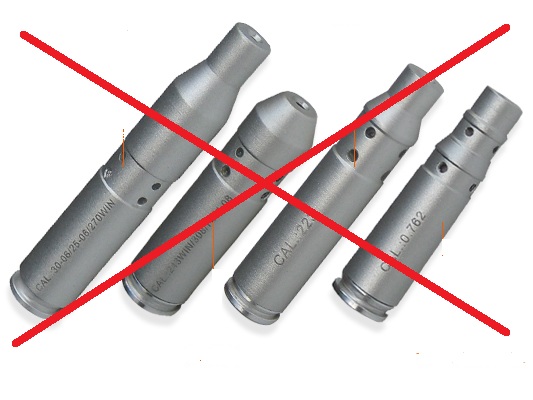
1. Do not buy boresighters that go into the chamber like cartridges. Rifle chambers are usually differ slightly in dimensions, and these
boresighters are made to accommodate the smallest. So in most chambers there is enough play that makes the beam not collinear with the bore.
2. Do not waste the money on a green laser. The claim that you can see it at a 100 yards is a lie; maybe at night, but you are not going to be
boresighting the rifle at night. Just buy a regular red one for $100 less. It will be perfectly visible at the distance where you will be using it.
I was clueless and bought "laserlyte kryptonite bore sighting system". Worst spent $150 ever.
3. While most ranges use optical boresighter, I found that many scopes are mounted high enough that these don't work. There is not a particular difference
in accuracy between them and a laser one, and the laser is more flexible.
4. The goal of the boresighter is to get you on paper. No boresighter in existence will do better than that - the final scope
adjustment is always - ALWAYS - performed at the range. Do not expect miracles.
Step 2. Position.
You will need at least 7 meters (yards) of space. 15 is better, but 7 is ok. For instance, the distance from a wall in one room through corridor to the
wall on the other room.
Tape the target to the wall so your rifle naturally points to it.
Unscrew the scope caps, if they are any. If your adjustment knobs look like this...
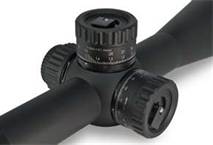
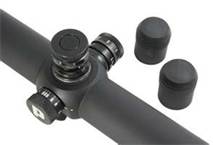
...you are in luck. If like this...
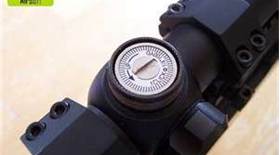
...well, get a coin.
Using the focus adjustment mechanism, get the scope to focus as much as possible on the target. This may not be entirely possible if the target
is too close. But it's OK if it will be a little fuzzy.
Step 3. Initial adjustment.
Insert the boresighter, turn it on. Look through the scope at the dot. Using scope alignment knobs, move the crosshairs so that they point to
roughly the same distance ABOVE the laser dot as the scope optical axis is above the bore's axis. For instance, if middle of the scope is 2" above
middle of the bore, you want the laser dot be 2" below the cross hairs.
Now rotate the boresighter 180 degrees. The dot will shift some - this is because the boresighter is not 100% collinear with the bore. Note the midpoint
between where the laser dot was, and where it is now in relation to the crosshair. Using scope adjustment, move the crosshairs such that they are above
this mid-point, the same distance as they were before.
This is as good as you can possibly get it at home. The rest of the work is performed at the range.
Note: the scope should be approximately in the middle of its adjustment range. If you find that the adjustment is close to the maximum of the possible
range in one of the directions, your scope mount is misaligned. You might want to compensate it with adjustable rings like
Burris Signature Rings. Otherwise you might have trouble with further adjustments
as required by the range test, and the scopes sometimes have harder time holding zero if they are at the end of their adjustment range.
However, if the rifle is a 22, and the scope is towards the lower boundary, or it is a centerfire rifle and you are a long-range shooter (300yd+),
having the scope bottomed out is actually very good. To compensate for the bullet drop you would be raising your POI quite a bit, so in the end
your scope might come back to the middle of its adjustment range. I always use 20MOA compensating inserts in my rimfire rifles for this reason.
Step 4. Theory.
The adjustment on the scope is most often graduated in either MOA (minutes of angle) or inches at 100 yards, which are almost the same. A typical
scope would have 1/4" or 1/8" at 100 yards (1/4 MOA or 1/8 MOA) shift per click. If your scope is graduated in mils or mrads and you do not know how
to adjust it, you have way too much money! For a low low fee of $400 per hour we will boresight the rifle for you :-)!
The directions of adjustment (up or down, left or right) indicate where the point of impact is going to be moving if you click the scope in that
direction. Important: point of impact, not the crosshairs! The crosshairs will be moving in the opposite direction!
So for instance, let's say the 10th ring on this target is 1" (it is actually a tiny bit smaller). Here we see that one flier, and 4 bullets grouping
around a center mass of .5" to the left and 1" below the center.
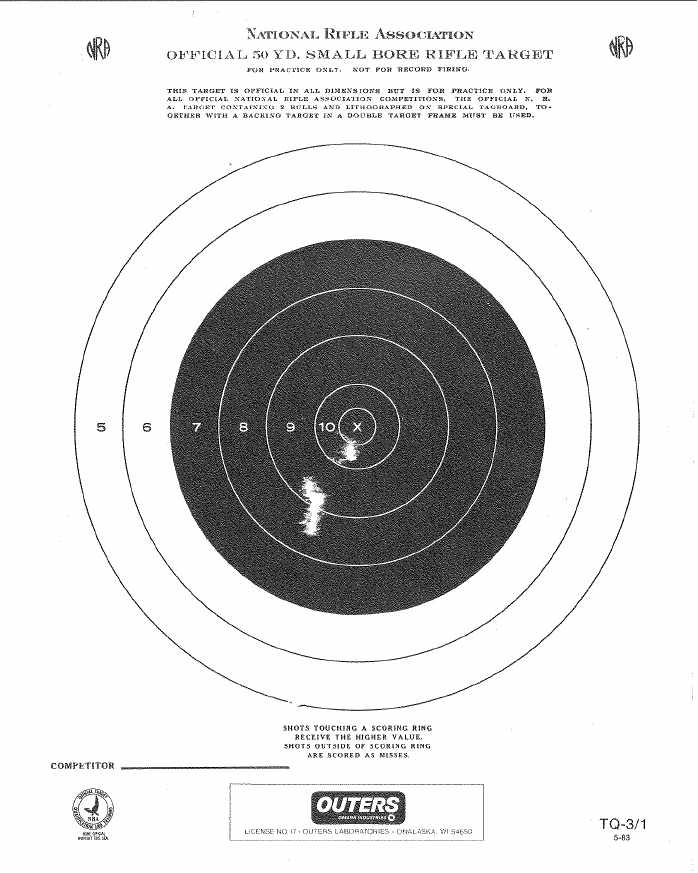
You need to move the POI 1" UP and 0.5" to the right. If If the distance were 50 yards,
and your scope adjustments are 1/4" per click at 100 yards, you will need to perform 8 clicks UP, and 4 clicks RIGHT.
If the target were at 25 yards, it would have been 16 and 8 clicks. If it were at 200 yards - 2 and 1 click.
Step 5. Practice.
This step is performed at the range, assuming that previous steps have been completed. Your scope is approximately adjusted, so your shots
will be on paper.
The boresighting should be done at a reasonably close range - 50 or 100 yards. If you go to 300, the crude alignment done at home will
be insufficient to get the shots on paper.
The paper should have an artifact of a known size, for instance, a 1" bulls eye, so you would be able to estimate how far the shots are
landing from the center.
Fire 3-5 shots aiming at the center of the target. Estimate the distance between the center mass of the target and the center. Using the
adjustment knobs, move the POI in the direction of the center (see 4). Repeat until the center mass is perfectly centered.
Note: Resist the temptation to adjust your point of aim to compensate for the scope. Always aim at the center of the target, and
use target knobs to adjust the scope.