How to make a sniper rifle. Part 5: Accurizing a Mosin Nagant
When it comes to any rifle's accuracy, excluding the optics and the ammunition, there
are 5 attributes of the rifle itself:
- Mechanics of the barrel
- Quality of the bore
- Weight of the trigger
- Contact between the receiver and the stock
- Contact between the barrel and the stock
We don't have any control over #1, the mechanics of the barrel was fixed when the
gun was designed. Note that the thickness of the barrel per se does not lead to accuracy
in and of itself. However, a thicker barrel dissipates the heat quicker and more evenly,
and therefore is less susceptible to thermal warping and other changes of geometry as
it heats up during shooting. This is why benchrest barrels are rather thick. If one allows
the barrel to cool down to uniform temperature, a thin barrel would be as accurate as a thick
one.
Similarly, for a mid-power 30 caliber bullet the length of the barrel does not
contribute to accuracy, and a super-long barrel such as Mosins can even reduce it
somewhat because of the whiplash effect. Most of the speed for the 30 caliber bullet,
especially when using normal loads, is actually acquired during the first 24", so the
last 4" of Mosin's barrel are simply not productive.
Be it as it may, we really only control #2 when we buy the rifle. Make sure
you inspect the bore carefully when you buy in at the retail store, or pay extra
$30 to J&G Sales so they do it for you when you buy it on the
internet.
#3, the weight of the trigger is the force with which the
trigger needs to be pulled for the rifle to go off. A typical military rifle has
a 8lb trigger weight. a typical benchrest rifle's trigger pull is measured in
ounces. The heavier the trigger, the more the rifle is deflected by the finger
pulling the trigger, the more variance on the impact point and the wider is the
group.
A Mosin trigger is an extremely simple system, it is typically
very heavy, and has no support for adjustment. You can lighten it somewhat by
shimming it with thin pieces of aluminum (e.g. cutouts from the soda cans) by
putting them between the receiver and the base of the trigger spring, but unless
you are ABSOLUTELY SURE that the rifle will only be loaded at the range and
only when pointing towards the target, I STRONGLY recommend against doing it. A
trigger modified in this way can go off on its own - or if the rifle is struck -
at any point, which makes the rifle extremely dangerous.
So it is #4 and #5 that an amateur (and not so amateur) gunsmith can control to improve the
accuracy of his or her rifle. This is what I am going to describe
here.
The rules around the stock are extremely easy: you should avoid
having barrel touch the stock at all costs; conversely, the receiver should
contact the stock as tightly as possible. The techniques that ensure that are
called "free floating the barrel" and "glass bedding the receiver".
Free floating the barrel
Given a very long stock that goes almost all the way to the muzzle this is hard to do without
cutting off much of the forward section of the stock. Instead of doing this, you
can sand a thin layer from the internal channel of the bottom part, remove the
hand guard, and put a piece of cork board between the barrel and the tip of the
stock:

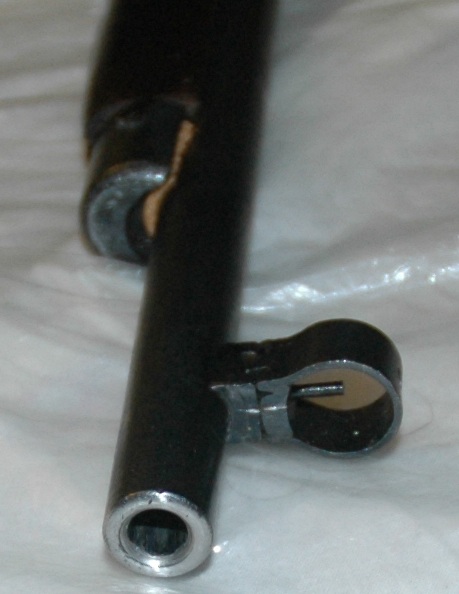
To test that there is no contact
between the stock and the barrel, put a dollar bill between the stock and the
barrel forward of the corkboard shim and slide it towards the receiver. The
paper should slide freely.
Glass bedding the receiver
If the shot group has a wide (2"-3") dispersion in
the vertical axis the culprit is almost always the bad contact between the stock
and the receiver. To fix this, the receiver is "bedded" into the stock with a
layer of epoxy. Alongside free floating the barrel, this is the best way to
improve the accuracy of an existing gun.
To do this, the bottom layer of
the receiver is covered with a release agent to make sure that epoxy does not
glue it to the stock, the layer of epoxy is then placed on the stock near the
recoil lug (the front part of the receiver), and the rear screw.
The receiver is screwed in lightly, the layer of the epoxy that squeezes out from
the sides is removed, and it is left to sit for a period of time.
When the epoxy hardens, the receiver is lifted out of the stock, the release agent is
cleaned off. Then the gun is put back together using normal (high) tension on
the screws, and left alone for another 4-5 days until the epoxy cures
completely.
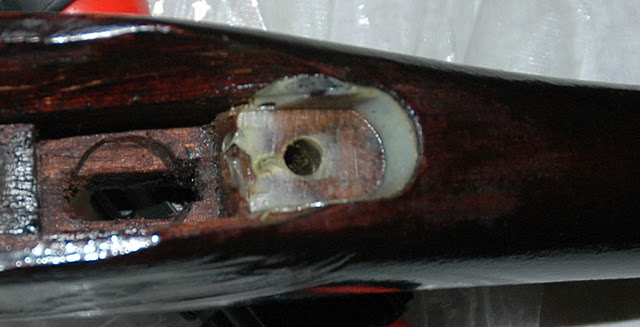
The results should look something like the following.
1) Recoil lug
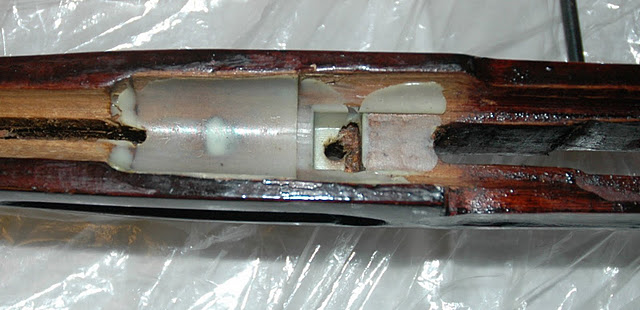
2) Rear screw
A few tips...
1) I have used
both the Acraglas Gel (you can find it at
http://www.brownells.com/) and JB Weld (the technique is described here:
http://www.theboxotruth.com/docs/edu75.htm)
and the results seem to be the same with JB Weld being much cheaper ($6 vs. $25).
2) If you do use Acraglas, be sure to use the car wax as a release agent (again, see here:
http://www.theboxotruth.com/docs/edu75.htm
for the pictures), the release agent that ships with the kit does not work very well.
3) Less is more in this case. You can always repeat the process if
you put too little, but if you put too much, you will have sticky goo all over
your stock, the barrel, and the receiver that will be hard to get off.
4) Remove a 2-3 mm layer of wood saturated with oil and lacquer from the bedding
area using a Dremmel tool. If you don't, the epoxy mold may not stick, or you
will have contact problems between the bedding and the wood.
5) If you use Acraglas, be sure to read the manual completely before starting.
Contents
- Introduction
- Buying
- Cleaning
- Disassembly
- Accurizing
- Selecting a scope mount
- Mounting a side rail
- At the range