How to sell or transfer a handgun when the customer has a CPL.
Handguns are transferred with a simple background check when the customer has a Concealed Pistol License.
Step 1: Check documents
Customer needs to have a current photo-ID and a CPL. If the customer does not have a CPL, you need to be in a
different section. At least one document (DL or CPL) should
match his or her CURRENT address (where they reside right now).
Ask: Can I have your driver's license and a CPL? Is your address on at least one of
these documents current?
If the address does not match, the customer needs to produce a GOVERNMENT-issued document, such as:
- Car registration
- Voter registration
- Tax bill
Say: we can accept a car registration or a voter registration with the correct address to
supplement your driver's license. We cannot use your utility bill or bank statements.
The following will not work, as they are not issued by a government agency:
- Credit card statement
- Bank statement
- Utility bill
Customer must be 21 years or older to buy handguns and receivers. Note the receivers, many young customers miss this detail.
If the customer is not a citizen, he or she will need an A# or IR#. A# consists of 9 digits, IR number consists of 11 digits.
They must have this information to proceed.
If the customer is a permanent resident, he or she is treated as a US citizen - no additional documentation is required (except
for the aforementioned A#). If the customer is NOT a citizen or a permanent resident, he or she needs a WA state
Alien Firearms License and a hunting license
or a documentation of membership in a shooting range/sporting association. The later must have the customer's name and address,
so most people just get a hunting license.
Step 2: Ask customer to fill out a from 4473 questionnaire on the computer.
Say: can you please go over to the computer and enter your information? If you never bought
from us before, you can skip the first screen.
At the end, the customer needs to click SUBMIT button.
Step 3: Create an appropriate transaction.
On the main screen in POS, click...
- Local Sale if you are selling the gun
- FFL Transfer if you are transferring the gun from the Internet business
- I-594 Transfer if you are transferring the gun from a private party (Internet or face-to-face in the store)
Different types of transactions - transfers and sales - do not mix. You will need to create separate transactions for them.
Verify that you are in the correct form. For a sale, the transaction type will be "LocalSale", the tax classification will be
"Taxable Sale/Transfer", and the tax will be 9.6%:

For transfer, transaction type will be "Transfer", the tax classification will be
"Taxable Sale/Transfer", and the tax will be 9.6%:

For private party transfer, transaction type will be "Transfer", the tax classification will be
"In-state transfer" (even for Internet transactions!), and the tax will be blank:

Step 4: Add the firearms.
Skip this step and go to the next one if you are doing a background check for the Internet transfer, and
the gun has not yet been received.
If the customer is buying something else (firearms or not), other items can be added to the same sale transaction, but if this transaction is
transfer, you will need a separate sale transaction.
Please note that if you cannot add the firearm to the transaction, it was accepted incorrectly: you are trying to transfer a gun
which was accepted as a stock item (for sale), or sell a gun that was accepted as transfer. Your system admin can fix the original
transaction for you.
Step 5: Initiate the background check
Click on "Customer..." button. A dialog will appear allowing you to select a customer. On the first page there will be an "Electronic Forms"
tab, there should be your customer there. Select the Electronic Forms radio button, and highlight the customer name by clicking on the row
selector (area to the left of the First name)
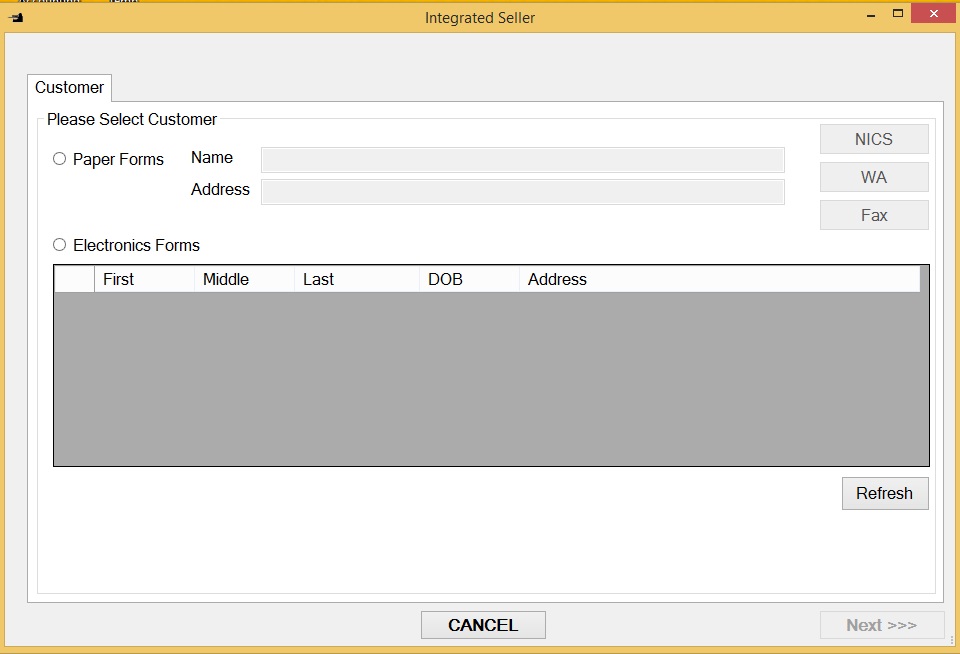
Verify the following:
- The First, Middle, and Last name are as they appear on the ID, for example, if the DL says "Alexander", the name should not be written as "Alex".
- The names are spelled correctly, fully, for instance, if middle name is spelled fully on the ID, it should be spelled fully here.
- The names are not transposed (first is not entered as last, and vice versa).
- The DOB is entered correctly, and not transposed.
- The address is correct.
Note any mistakes. Click next to go to the next page (Next button will not light if you did not select the customer correctly).
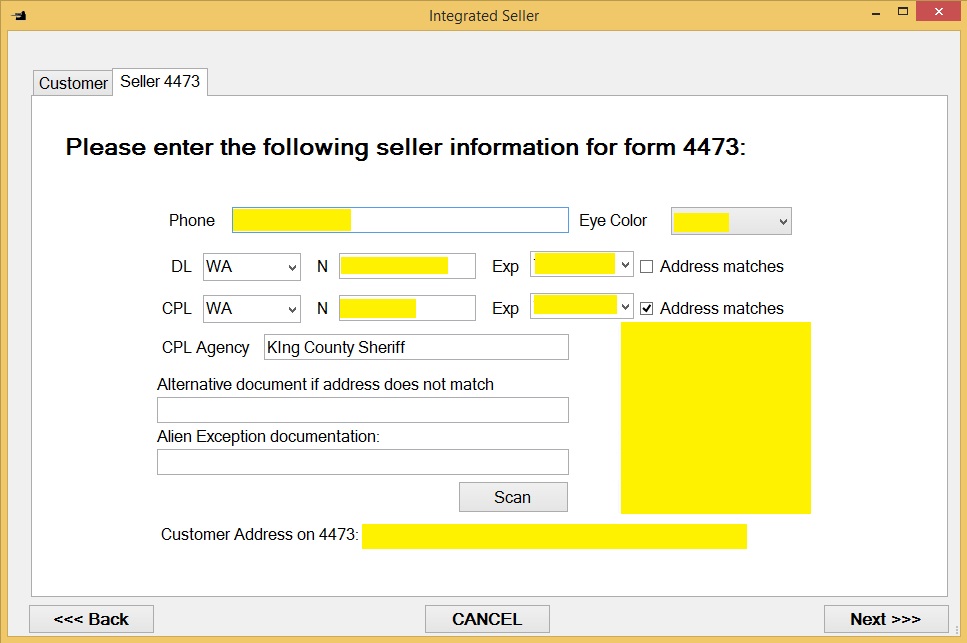
Enter the driver's license, and press TAB. The driver's license can also be scanned in using a scanner on its barcode. The
system will automatically verify the driver's license with the state, and fill out the expiration date. Enter the CPL
information, phone number, and eye color.
Double-check the address on the DL or CPL once more, and if the address matches, check "Address matches" box next to the document on
which the address is correct.
If neither the customer's DL nor the CPL contains the right address, you need to populate the Alternative document field.
Scan all customer documents (including alien firearms license, if applicable) into one page, and PRINT it
from the scanner page to make a copy. The image will appear in the bottom right corner of the screen. If you forgot to print, make a copy
on a copier.
Step 6: How to correct customer input
If no mistakes were made by the customer, skip this step and proceed to the the next step.
Click through the end of the Integrated Seller form, until you see the "Finish" button. Click it, and then park the transaction.
Send the customer back to the customer input station. On the first screen, have him or her enter the exact information he supplied
in the previous, incorrect form - for example, if the name was transposed, it should be entered transposed. All fields on the first
screen need to be entered.
This should bring the customer record back up. If customer makes an unusually complex error which he or she then fails to reproduce
on the first screen, this may not work. In this case, the customer will have to re-enter all of the information.
Most of the time, however, the customer can just edit the wrong pieces, and resubmit.
After customer clicks Submit, you will need to reopen the transaction (from Continue Transaction button on the main screen), and
click the Customer Button again.
You need to select the "Electronic Records" tab again, and customer name again - this time, with the correct information (please do not
forget to verify it again!).
After you click Next, the correct information will be re-imported into the transaction. Go back to the previous step
to verify everything.
Step 7: Form 4473

Here you will generate form 4473 and perform the background check.
First, ensure that the correct item is checked - handgun, long gun, or other (other is the receiver). If the button is not
checked, check all appropriate buttons now. The button will not be checked if you did not add the gun to the transaction.
Click on 4473 button. This will open the newly generated form (note: every time you click this button, the form is
regenerated. Print the form, then immediately close it. Closing it is very important, as the program will try to
upload and delete the file when you move to the next step, and this will fail if you do not close it.
Proofread the form.
Verify the following:
- The First, Middle, and Last name are as they appear on the ID, for example, if the DL says "Alexander", the name should not be written as "Alex".
- The names are spelled correctly, fully, for instance, if middle name is spelled fully on the ID, it should be spelled fully here.
- The names are not transposed (first is not entered as last, and vice versa).
- The DOB is entered correctly, and not transposed.
- The address is correct.
- The A# (or IR#) is correct (if the person is not a US citizen).
- The answer to the question 11a is "Yes" (unless it is a spouse picking up a gun returned from repair, in which case
the question must not be answered); the answers to questions 11b-11k must be "No".
- If the answer to the question 11l is "Yes", the customer must have WA State Alien Firearms License, and a hunting
license.
- If the State of residence is not WA, we cannot transfer handguns or receivers (we can only transfer long guns).
- If in Question 14 the country is not US, the number in question 15 must be supplied.
Have the customer proofread the form.
Say: Can you please read this form very carefully, and if everything is correct sign and
date at the top of the second page?
After the form is signed (16) and dated (17), you can proceed to...
Step 8: Background check
Say: I will now do the NICS background check. This will take a few minutes. You are free to
take a look around the store, I will let you know when it goes through.
Click on NICS button. The NICS portal will open. The user name will be pre-populated.
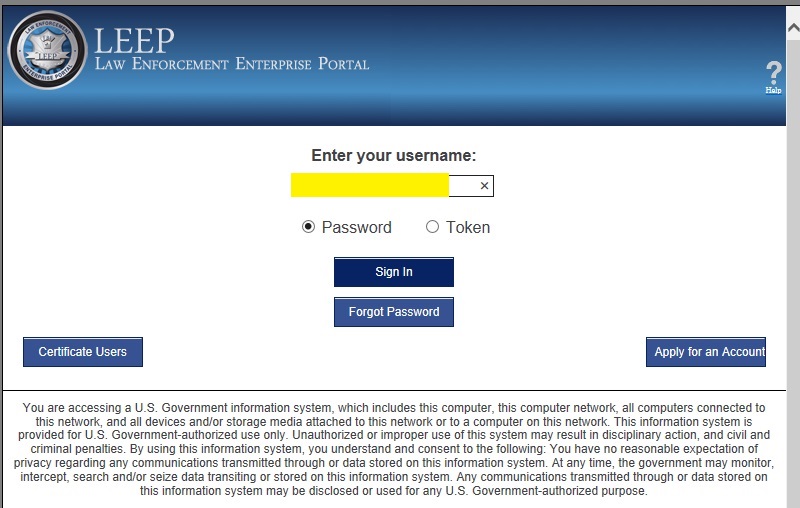
Click Sign In. After that, if NICS does not recognize this computer, you may see this screen.
The answer to the challenge question will be pre-populated.
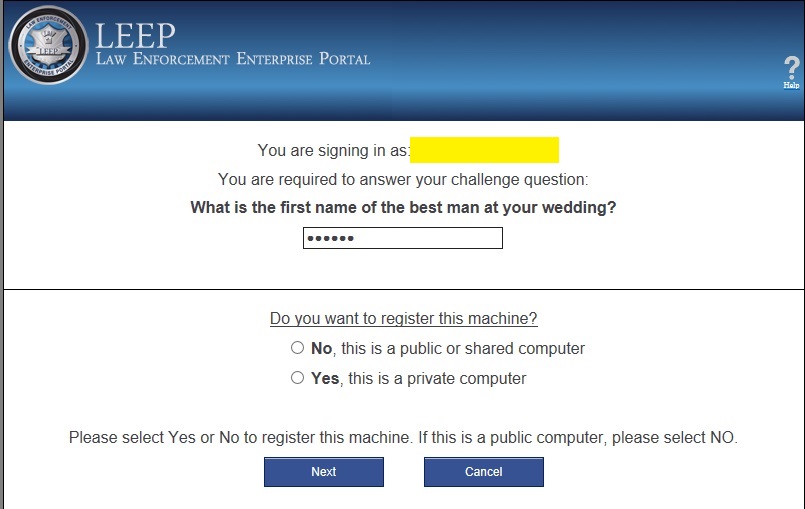
Click Next. The password will be pre-populated. Click Sign In again.
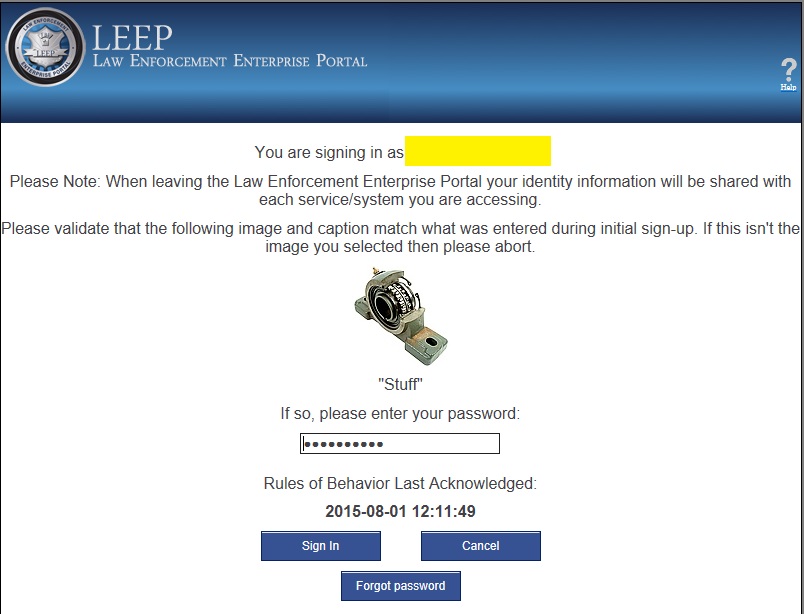
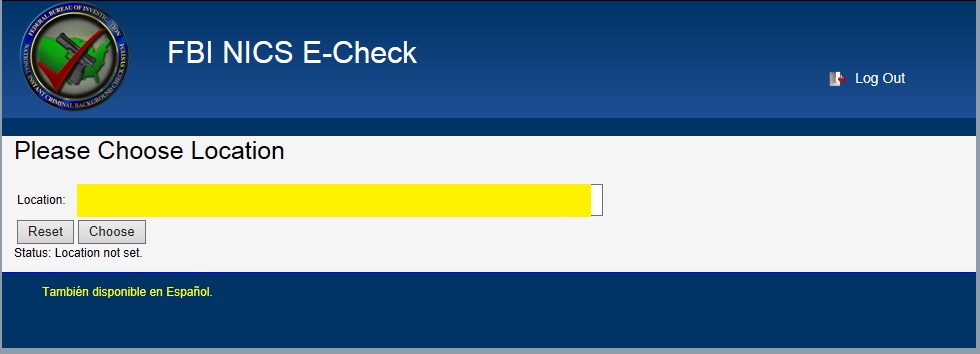
Depending on the account setup, you may be asked to select the store. Highlight the correct address, and click Choose.
You will see the list of the current transactions.
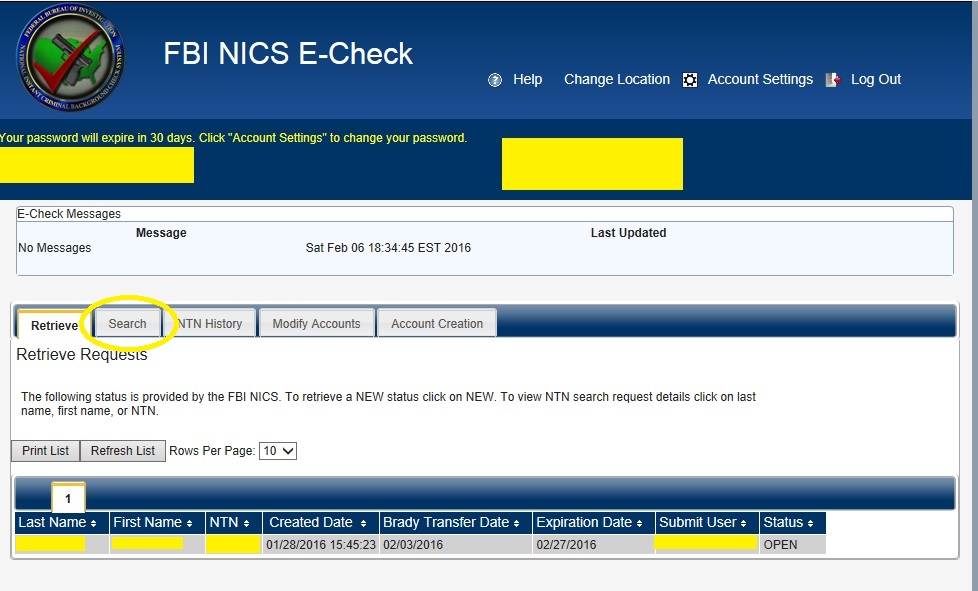
Click the Search tab. The search form will open. If the customer is not a US citizen, click the link in the top right corner
that says "For Non-US Citizen searches, click here."
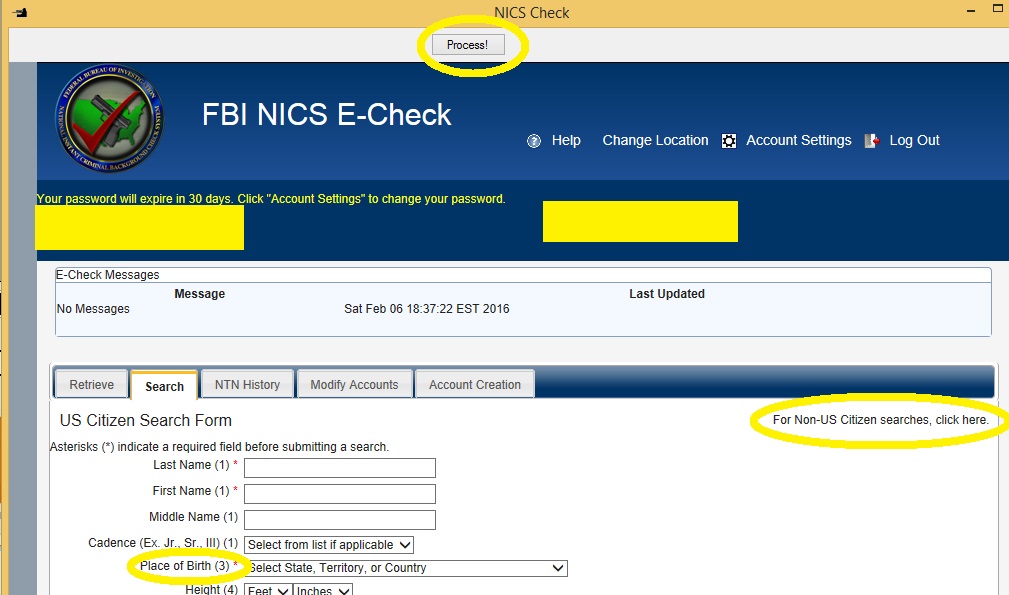
After this, click Process button above the form (top middle of the screen). This will populate the form with the
information on form 4473 that the customer has entered.
Examine the country and/or state of birth as entered and verify the correctness. For some states, territories,
and countries the program is unable to identify them correctly, and you need to fix the entries by hand.
For non-US citizens you will have additional input which you will need to supply:
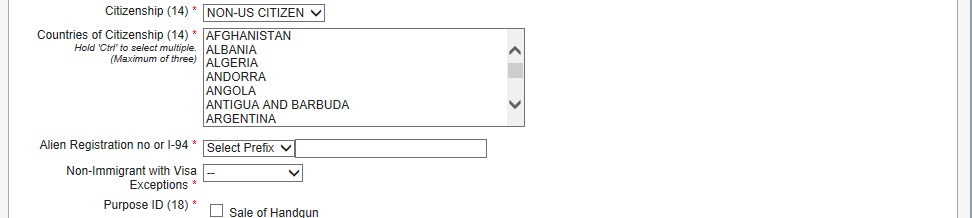
You will need to manually enter the AR or I-94 number (AR number is 9 digits, I94 number is 11 digits), select the country or
countries of citizenship (be careful with this input, it allows multiple countries to be specified - beware of spurious clicks).
The answer to question "Non-Immigrant with Visa Exceptions is "Yes" for people who are not permanent residents, and "No" for
permanent residents (they are immigrants).
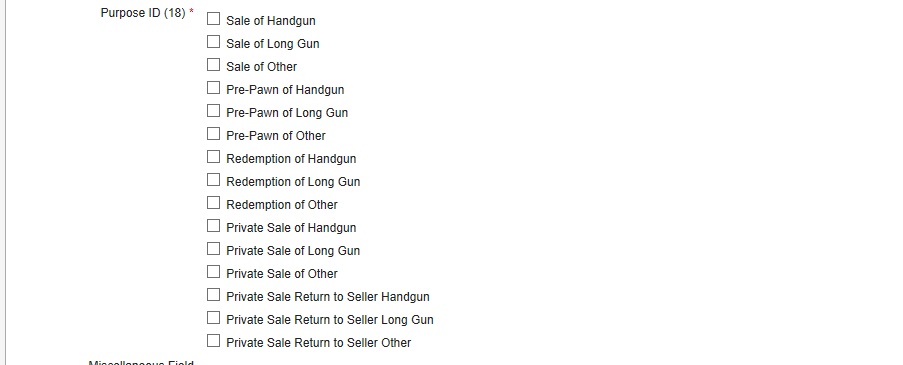
For all, you will need to specify the type of transfer. It is either a "Sale..." if we sell the gun, or we transfer the gun
from the Internet, or "Private Sale..." if we are doing private sale transfer (face to face or over the Internet).
After all this information has been populated, click "Continue" at the very bottom of the web page. This will lead you
to a summary page. Proof read it, make sure for the last time that the name, DOB, and other information is stated
correctly, that the correct country of citizenship is specified for non-US citizens, etc.
Click "Process" at the top of the screen to save the summary, and then click on "Submit Search" button at the bottom.
The system will return you back to the main page where you can...
Step 9: Retrieve the status of the background check
You will see the list of the background checks which are currently pending. The last column (Status) will have the
following status codes for each background check:
- Pending - the check has just been submitted, click refresh to update the status
- Researching - the background check has been referred to a human to investigate. The transaction can be stuck in
this state for up to 30 minutes, but usually completes in under 5 minutes.
- New - status update is available for this transaction. See below.
- DELAY - the background check was referred for an extended review. See below.
- DENY - the background check was rejected. See below.
- OPEN - the check did not complete in 3 days. See below.
At this point, record the NTN code in Form 4473: date in 21a, code in 21b.

New...
Click on the status, and a window will open where you can retrieve the status of the background check. It could be either Proceed,
or it could be informing you that the time interval allotted for the background check is expiring (or has expired), and we can
transfer the firearm.
If the status is Proceed, you need to check the Proceed box in 21c. If the initial response was a DELAY, the status is marked in
21d.
Say: Congratulations, your NICS background check has succeeded!
If the status is simply announcing the expiration of the time period, we are obliged by WA State Law to wait for 10 days,
instead of federally mandated 3, for the status update.
You can close the NICS dialog at this point.
DELAY
The background check was referred to an extended review by a human investigator. The result will most likely not be
available the same day. NICS will be usually returning the results within 3 days, but it may take longer. By law,
we can transfer the gun after 10 BUSINESS DAYS (excluding holidays and weekends) have expired since the day AFTER
the day the transaction has been submitted.
Say: Unfortunately we got the DELAY status on your background check. This means that a human
investigator will be looking at it, and they have up to 10 business days from tomorrow to complete the check. They
usually finish it in two to three days, however. We will contact you as soon as we get the status update.
After receiving the DELAY status, check Delayed box in 21c, and collect the customer's email address and the phone number.
These can be written at the top of Form 4473, or on a separate yellow sticky note plastered over the form.
You can close the NICS dialog at this point.
DENY
In practice, you should never see this status immediately after the background check was submitted: normally it will
got to DELAY for a few days before moving to DENY.
DENY means that NICS determined that the customer cannot posses the firearm. See how to handle this situation
here.
OPEN
You will never see OPEN status right after submitting the search. OPEN means that though the status have not been
received from NICS, the gun can be transferred according to the federal law.
WA state, however, has a stricter law, which requires waiting for status update for 10 business days, starting from
the day after the search has been submitted.
Step 10: WA State Pistol Transfer Form
If the NICS returned DELAY or PROCEED, we need to generate WA State Pistol disposition form. The only exception is
if the firearm is not available, and we are running the preliminary background check - or we are doing the private
face-to-face transfer, and the firearm is not yet logged in.
If this is the case, wait for the background check to succeed, park this transaction,
accept the gun into the inventory,
add it to the transaction, regenerate form 4473 and reprint pages 3-4 of it. Then restart from here.
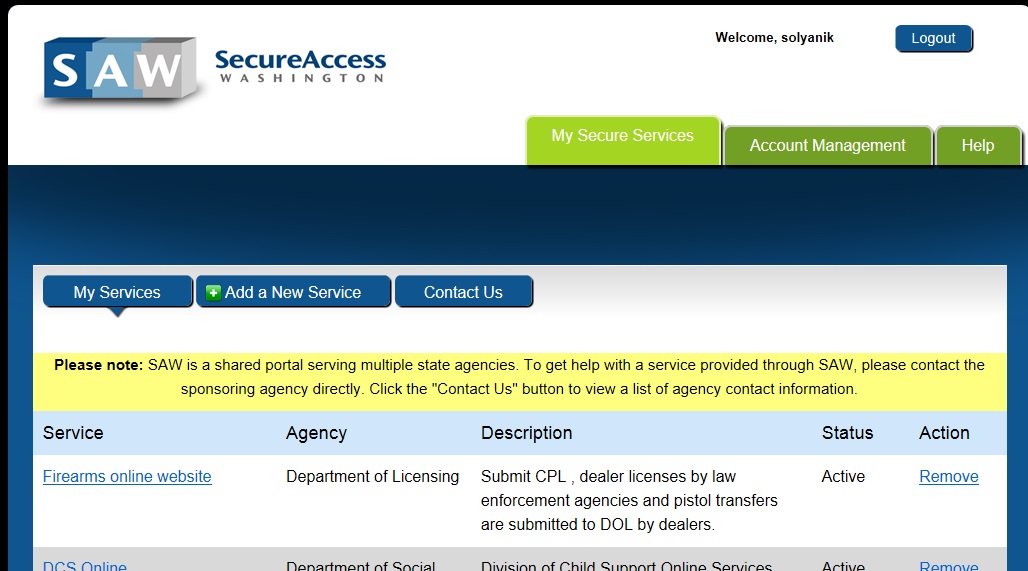
Click the button "WA". This will open Washington Secure Access. The credentials will be pre-populated.

Login. You will be on the master page and will be able to see the link to the Firearms Online Website.
Click on this link, then when the site opens, click "Submit a pistol transfer":
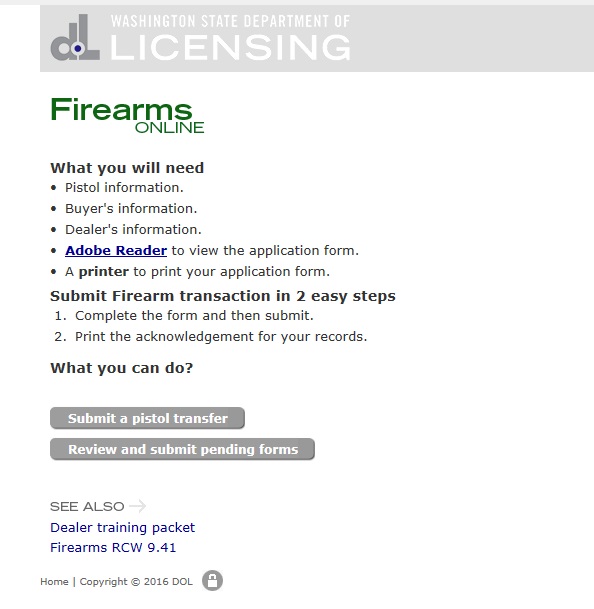
The application page will open. We need one form for each handgun. There will be a selector at the top of
the page with every handgun that is part of the transaction. There is also "customer data only" option
which populates only the customer data into the form. This is used for handguns which are not yet on hand -
which are in the process of shipping from a remote location, or not yet entered into the system when doing
face-to-face private transfer (see here for general process for
private transfers).

Select the right firearm and press "Populate!". This will enter the firearm's detail into the form. Please note
that state form has names of manufacturers, calibers, and so on that are different from the nomenclature we use
in Precise Shooter. The program tries to map the ones we have to the ones that the web site uses, but it is not
always successful.
Therefore PLEASE CAREFULLY PROOFREAD THE WHOLE PAGE after populating it, and correct all errors.
The information which you will always need to supply would be whether the firearm is new or used, and
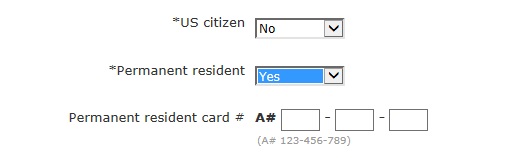
details for non-resident aliens...
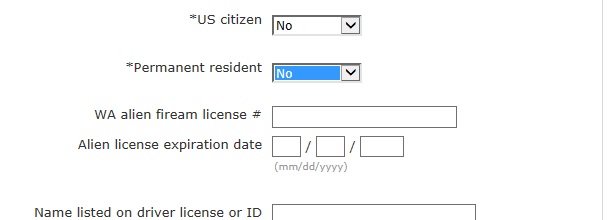
...and permanent residents...
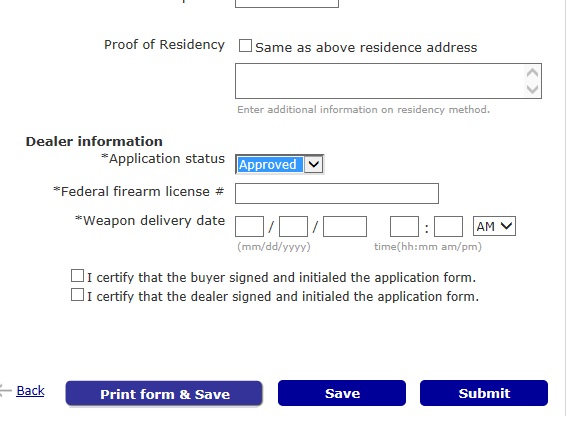
At the bottom of the page you will need to supply proof of residency.
Ask the customer: Have you lived at your current address for more than 90 days?
If the answer is yes, click the "Same as above residence address" box. If the answer is no, you will need to
put the customers' previous address if it was in WA. If the customer did not live in WA previously, he or
she can establish residency by having military orders, or a driver's license issued by WA state. Put the name
and number of the appropriate document in the box.
If the NICS check status is PROCEED, mark application as Approved, and fill out the Weapon Delivery Date (and time)
using current date and time. Do not check boxes which ask you to certify things just yet. Instead, click the
"Print form & Save" button.
Depending on configuration of PDF reader on your computer, the opened PDF may be embedded into the window,
or open in a separate Acrobat Reader window. In either case, save it to {Directory where POS is installed}\WD.
The destination folder is very important - the application image is saved for future reference, and it is
saved from that one directory. You only need to pick the directory once - it will default to this location
from then on.
Print the PDF.
Most of the information will be pre-filled. You will need to focus on the circled areas, specifically, have customer
fill out the home phone (cell is OK), 2 residency question, read and initial the small text, and sign at the bottom of
Section B.
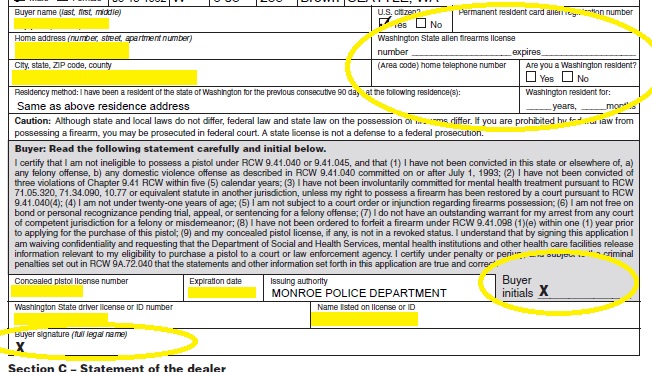
Ask the customer: Can you please fill out your home phone number, two questions on residency, then
initial and sign the form?
Note that for non-immigrant aliens the form has a nasty habit of mark them as non-residents. Have the customer
cross out, check the Resident box, and initial the change.
When the form is ready and correct, close the WA pistol transfer dialog, and CLOSE THE INSTANCE OF ACROBAT READER
if it is opened. Open Acrobat will cause the program to crash when you navigate away!
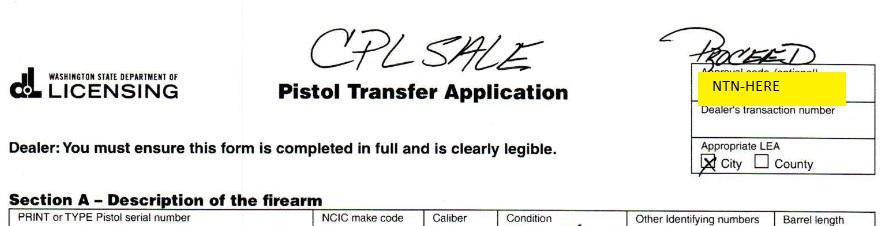
Write "CPL Sale" on top of the form, and put the NTN number in the Approval Code box. If the PROCEED status have been
obtained, write PROCEED above NTN. If the transaction has been delayed, don't write anything.
Repeat this for every handgun in the transaction.
Then click Next.
Step 11: Multiple Handgun Disposition Form
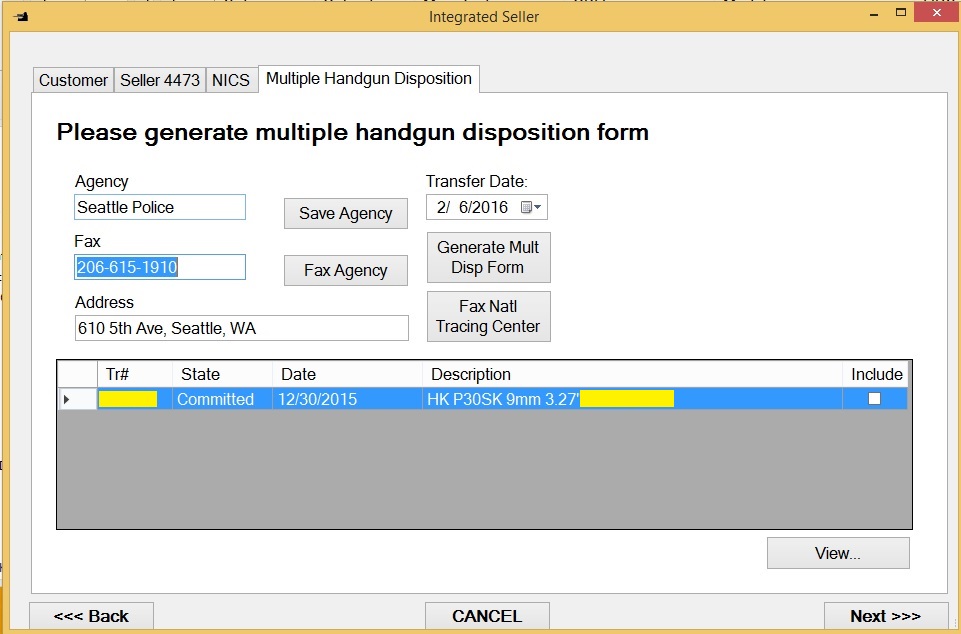
Skip this page for now - it will be used when we close the transaction. Click Next.
Step 12: Faxing pistol transfer application to local police
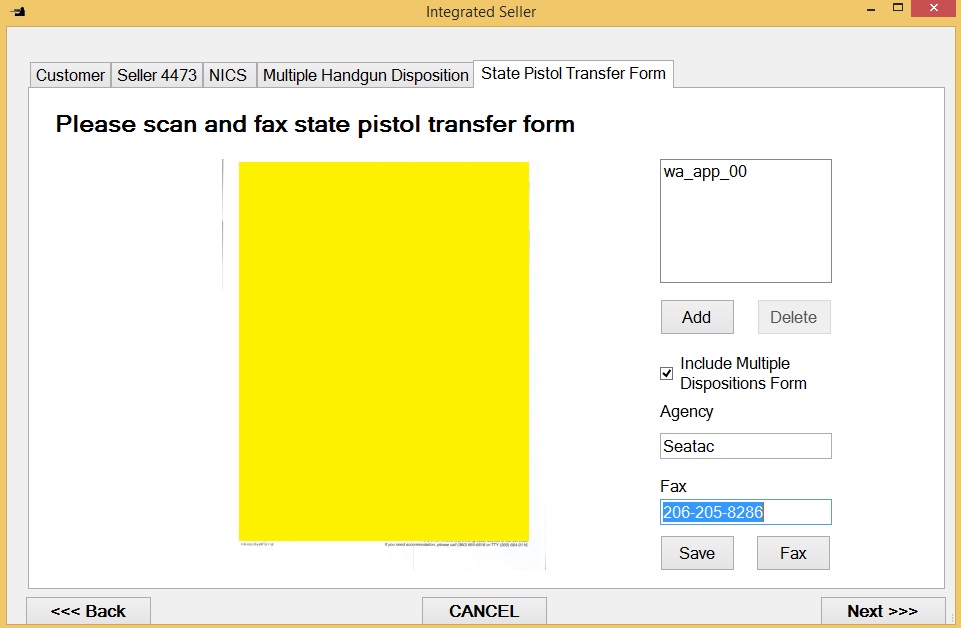
Skip this page for now - it will be used when we close the transaction.
Click Next. You should be on the last screen of the Integrated Seller form, which should
say "Click Finish to commit the transaction".
Click the Finish button.
Step 13: Payments
If the NICS has been delayed, Park the transaction at this point. We will collect the payment after the approval
is received.
If we are doing a face-to-face private transfer, and NICS status is PROCEED, ALSO park the transaction here.
Accept the firearm for private transfer now. Then reopen this
transaction, add the firearm to it, click on Customer, Press NEXT twice (getting to the Form 4473 page), regenerate
Form 4473, and reprint pages 3-4, which now contain the firearm line data. Click Next, Finish, and continue following
the instructions from this point.
If the NICS check has succeeded, customer can pay for the purchase or transfer.
For transfers double-check that the cost of the gun was entered correctly - including the shipping fee, before collecting
the payment.
Click on Pay to collect the payment.
Step 14: Park the transaction
At this point you should have Form 4473, a photocopy of customer's documents, WA pistol transfer form for
each handgun in the transaction, and, if it was a transfer, the copy of the documents that came from the seller. Staple all
of this together, and if the gun was handed to the customer, complete lines 30a, 33, 34, 35, and 36, and Section C on every
WA Pistol Transfer form. If the transaction was a private sale - local or the Internet - write "Private Sale" in 30c.
The transaction is not yet ready to be committed. The gun needs to be logged out of the FFL book, and the paperwork needs to
be reviewed by another person. Park it for now. Put the paperwork in the bin for transactions waiting for review.
See this page about closing the transaction.